Sunday, December 31, 2017

Modern Poncho with a Medieval Twist

Decided to take two yards of wool fabric that was not purposed, to make a heavier poncho like shawl for mundane wear. This was its undone state the week before Christmas.

 Though wanting to do some
embroidery for this project to add a touch of medieval flare. I  was originally not going to line it but later decided with the detailed wool embroidery it was best to protect the back and line the garment. So I added mother of pearl buttons for extra dimension on the textured floral motif.

 Here is the results of a nearly month long project. I did machine sew the edges for ease as this is a mundane piece not for scadian use. Though it was not at all a research project just a for fun as gold work supplies were in the mail. Wool outer fabric with a linen blend lining fabric. With matching linen collar,wool embroidery and mother of pearl button accents.

Looking forward to wearing this thicker
garment in the dead of winter to stay cozy. Doubles as a nice sewing lap blanket. You can see a few ways this could be worn. I tend to wear mine pinned off to the side.

My 2017 was super trying on a personal level. Though glints of the creative , as always feline shenanigans, lots of love from a special man helped keep things bright. Hoping 2018 just to be at super creative and a bit warmer with this newest addition.

Wishing you and yours a safe and Happy New Year!!!

Marrin O'Kealy

Thursday, December 28, 2017

Inspiration for 2018

Full length image of painting:
1582 Daniël van den Queborn (Dutch artist, 1552–1602) Portrait of Louise Juliana of Orange-Nassau aged c. 6, with a doll

 Close up of doll from painting:
1582 Daniël van den Queborn (Dutch artist, 1552–1602) Portrait of Louise Juliana of Orange-Nassau aged c. 6, with a doll

Close up of doll in painting:
LADY ARABELLA STUART AGED 23 MONTHS by Anon 1577 a portrait at Hardwick Hall. The little girl is holding a doll

Full length image of painting:
LADY ARABELLA STUART AGED 23 MONTHS by Anon 1577 a portrait at Hardwick Hall. The little girl is holding a doll

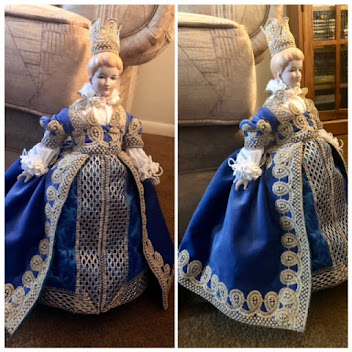
These are the images inspiring me to make the next two dolls. Both will need embroidery,  beading, and gold work skills to complete the dolls in a fashion close to these images. Besides the plethora of other skills listed in my documentation.

Very excited to get started as I'm gathering materials. In the winter such an undertaking for these two is making cold days pass joyfully. This is going to help me continuing to make the educational journey into period doll making, its influence in court and fashion in general. Of course also changing the course of girls play in the centuries to come.

Naming the dolls side note, to keep it easy. I decided to name each doll after their imaged owner. So the girl in the portrait, the doll ends up with her name. Easier to know which doll to which one may be referencing and also to know questions directed and such in conversations.

So my first doll is Pandora, as all the prior to 18th century dolls have a referenced as Pandora dolls in museums. This also was inspired but another blog who also used similar reference. This one of Swedish origin along a sea route to many places.

Then my second doll is named Elizabeth after the queen, also since the image has a red haired fashioned doll with pale complexion. Seemed only apt one was going to end up with the named for the reigning monarch of the age. The painting for this did not name the subjects represented in the portrait, so it was best to come up with a proper name.


So in going with the newly established rules.  Louis-Juliana will be the name for the replica of the doll in the 1582 portrait. This being a styled as a  Netherlands based court doll. Also another country with many sea routes to many places.

As well as Arabella being the name for the red court dressed doll in the 1577 portrait. Which is the last doll in the English style as two are only images from the English school of portraits I currently have researched. Also a sea faring people who have trade coming and going.

So in my theory all sorts of news traveled by sea being the easiest way around the continent that fashion traveled the same way dolls also communicated skills, textile wares and trade of techniques. So the extant is only 6 inches tall these would be easy to pack for a journey if need be.

Well that is some thoughts on the dolls and ideas I'm thinking about. As the next part in the journey begins.

Creative thoughts,

Marrin O'Kealy

Wednesday, December 27, 2017

Lace, Embroidery, and Lucet

Well finished the bobbin lace trim on the first doll. So she is fully complete as I can make by one person. There is gold on the outer gown over the gold wire originally placed. It gives much dimension and texture to the trim since I wasn't making it as wide as the extant. Being a first attempt at this kind of lace had to work within skill set.

Though this is a good first. Looking forward to not having to do this again soon, since I have enough to keep me in stock for a bit. I enjoy needle lace more.

The next project I started over Christmas, I making a wool shawl with
wool embroidery. This is for me mundanely but till be done on period materials and techniques because its fun.
Which the motif will be at the corners
around the collar and center back. Laid out pattern while doing laundry. The laundromat have the best tables for fabric cutting or design in a pinch. Feline seamstress assistant Jasper hard at work. I plan on lining the cloak to keep the back embroidery protected.

The other project over the past month has been lucet making drawstring for future projects. Either trim or other uses. Which has been relaxing while at work.  These are made from hemp and are a nice thickness.
 I also have wool waiting for waiting cord in 3 colors. Finished the three colors of linen and have several yards of each in red, black and white. The 3 most common colors in Tudor clothing and accessories according to the Tudor Tailor and other sources. 

I am waiting for the goldwork wire in silver and gold gilt to be picked up at the post office.  My hours do not coincide during the work week with the open lobby hours. So looking forward to seeing it and if I need larger quantities for the next two dolls. Shiny things on the way.

Going to be precious shiny for 2018,

Marrin O'Kealy

Tuesday, December 12, 2017

Lucet in the meantime


I am working on more lucet while waiting for doll supplies to come in the mail. These are goldwork threads in silver and gold gilt. Giving me enough for two dolls worth of outer gown decor. Part of my Christmas gift, so its taking time.

Also trying to locate the doll heads I made earlier this year. Since my sister moved in, many things have moved or relocated. Which was useful I have been able to locate extra stands and supplies that I didn't know I had. Though the prepainted faces are mia right now. St Anthony is being lax despite my prayers.

So pictures of progress more dolls to come.

Marrin O'Kealy

Sunday, November 26, 2017

A Rainbow of Lucet

Created some lucet cord from hemp twine. I was able to make several lengths in a rainbow of colors.
  Then these are the ones that I am working on now. These are linen and will also being making the same 3 colors in wool too.
Hoping to have lengths for drawstrings and ties for whenever I would need some on hand. Cats are thrilled with the creating of string.

Well this is going to help me to transition into my next doll project. Still trying to figure out which one from the binder of doll images.

Keeping busy,

Marrin O'Kealy

Wednesday, November 15, 2017

Lace Gallery


Lace Details


Linen used was 32 threads per inch 100% linen fabric. I found the finest from a local cross stitch shop, as it would be easier for me to see in person the thickness I am purchasing.  This was edged to prevent fraying and then stitched to a wooden frame for the lacework to be completed. Keeping in mind the tension needed consistency which was a challenge during this part of the project.

The side vertical channels of the design are 14 threads across with 6 on either side of 2 in the middle. The middle vertical channel is 20 threads across with 9 on either side of 2 in the the middle. The bottom horizontal channel is 40 threads across with 18 on the top and 19 on the bottom and 3 in the middle.

In cases of direction, weft threads were cut for the horizontal channel and warp threads stitched into cross sections. Where as the vertical channels the warp threads were cut and the weft were gathered into cross sections stitched into place.

A knowledge of weaving for the direction of the fabric plus and knowing which threads to cut in which direction was very important for the project to remain organized. Luckily the design is geometric and makes the formula easier to figure out.  

All the pulled threads counted 6 threads to make vertical cross sections for the horizontal channel at the bottom of the design. Then gathered the same number for weft threads in the vertical channels. I used a buttonhole stitch to secure around all the channels and also as the stitch to gather all the cross sections.
 Letting some space for the foundation threads that would be later sewn with button hole stitch to meet the same thickness as the cross-sectioned threads. You can see the cross-sectioned areas are thicker in the adjacent photo. Foundation threads are thinner ready to be worked with the buttonhole stitch to give depth as well as attach to intersecting lines for stability and strength.

One of my major challenges is preventing twisting in the buttonhole stitches around the base threads on either the cross-sections or the foundation threads. This is where tension and consistency plays a role in the look remaining fluid through the whole design. I discovered this later in the making of this project and would much different than if I had known a little more technique at the beginning.
     
     Though as I began to realize I found ways of undoing the twist or making it work to more dramatic effect. So on occasion happy little discoveries can be made during the creation process.
I am certain this happens to many an artist in their work.
Fig 22
In this adjacent photo we have the first cross-sectioned piece all filled in with foundation threads all stitched and intersections secured. This is really where I could see all the potential of the design working into the final look.
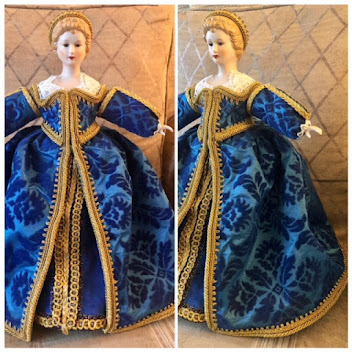
Till this point I was considering starting over and considering other options for this feature of the doll. Though I knew this was the centerpiece and everything was working up to this point and the apron had to be handmade lace. It may not be the best piece of lace but its my first piece and though its not as exact as I would like am very proud about not giving up and completing the task.

In the end its not always the most perfect piece that tells us an exciting story. Instead the one that needs some work or is a beginner piece that states the character of the creator of the art. The adjacent picture shows the first circle loop completed is the center of the design and gives it some extra geometric character to the linear for the horizontal channel. There is more circle motifs in the vertical channels as well to create a solid unity of design.

All the buttonhole is worked in a fine 2/100 silk thread from white wolf and phoenix and is just great for this kind of fine work. Beeswax of course to prevent fraying and tangling. I also used a wider white silk for edging and finishing for this piece.

In the images below from left to right I show the process of lining out the channel, snipping/pulling, them bordering the channels, and stitching cross=sections then adding sterling silver jump rings to make smaller circles for the upper channels.

The over all design is representative of the lace apron in the painting but a few changes of design due to unrefined skill level abilities though a strong first attempt at pulled lace embroidery.

Wednesday, November 1, 2017

Tuesday, October 31, 2017

Poppet!

As you can see from my prior post, I made some changes to the second doll. I added silk accents to be closer to the lines we see in the painting. Changed the cone like support structure to legs stuffed them and added shoes. Reevaluated the hair decor made it smaller. Rearranged the ruff to make it fluffier.

The apron is in process. Its also handmade lace and will take a length of time to complete. Which will be the last finishing touch.

 I have found a source on modern child psychology on the significance of play and its effect on development. Now its a modern source, as this was not a focus in the 16th century. Though was suggested from a class evaluation would give some added depth. I think its a great idea and am finding ways of incorporating into my research and class material

I am teaching Hello Poppet at Fabric Fiber and Fighting on November 18th. I have enough for 10 spots so if you can make it, hope to see you there.

As a reward for all the hard work for family related issues this summer. I am attending Æthemearc Academy this November 4, won't be teaching but will catch up with everyone.

Looking forward,

Lady Marrin O'Kealy

Doll Gallery


Replica 1560's Venetian Italian Fashion Doll

Replica 1560's Venetian Italian Fashion Doll

Replica 1560 French Fashion Doll

Replica 1560 French Fashion Doll

Tudor Q and A

What is a Tudorosity?

A mashed combination of the words Tudor and Curiosity to create the word Tudorosity. Tudorosities is the plural form and the deffinition is as follows.

Tudorosity- an desire to learn or know anything about the Tudor dynasty associated with years 1405 through 1603.

Most people ask my why I make the Tudor garb ?

I find the clothing of this era not only beautiful but also challenging to sew. There is much more care and purpose put into making garments and wearing garments in the Tudor Era. I love the look of Tudor so much I wanted to explore the way clothes were made back then and the subtle changes in fashion and styles of time.

How did you get started in this interesting hobby?

I started with art first, I love to draw, paint, and sculpt all the traditional fine arts. So being able to draw helps me visualize the looks I want to create in my garb. History has always been a huge interest of mine and I've had a knack for sewing since I was 7 years old. It all started with doll clothes and I learned cross stitch embroidery from my grandmother when I was little. I am self taught sewer, crochet, knitting, embroidery and tatting. My methods are learned from books mainly and there is still so much more to learn.

What is my favorite outfit and why?

It would be like picking a favorite out of one of my future children, its impossible. I love all my gown creations and really like the distinct differences in all the styles clothing I make for the Tudor Era.

Do you make the whole outfit including hat, shoes, and undergarments?

I do have a goal of making a complete Tudor from the skin out. As of right now I make 90% of my gowns and accessories. The shoes and stockings, are bought online and the petticoats are a close reproduction but not made by me. .

How long does it take to make a gown?

It all depends on the type of gown. The making relies on the time period and class of the design. Generally if I work on it 8 hours a day on a sewing machine it will take 3 days to get the basics and another 5 days to do finish hand-sewing details and beading. So a week to a week and a half if working on it steady for that amount of time. I work a full-time job so it does take longer than a week to complete. I put over 40-100 hours per outfit depending on its complexity, its like its own full time job of sorts.

Do you make renaissance clothing for sale or custom orders?

No, due to new employment and changes in my lifestyle. Unfortunately, I have no time to support sewing for others. Though I recommend sewing lessons for those adventurous few. There are many fine folks who make and sell historical clothing. I suggest guidance with sew from many fine historical enthusiastic costumers out on the internet.

How long have you been making these elaborate costumes?

I have been in the Society of Creative Anachronism coming up on my 18th year. Active since 2004 working at demonstrations and volunteering when I could between working and other life's distractions. I really concentrated on Tudor sewing in 2007 and worked with patterns to learn proper fabrics, techniques, fit, and silhouette. I really enjoy the eras transition from a medieval form fitting layered cotterdie to the boned Tudor kirtle and then to structured Elizabethan clothing.

Replica 1490 Milan Italian Fashion Doll

Replica 1490 Milan Italian Fashion Doll
Based on art by Giovanni Ambrogio

O’Kealy Heraldry

O’Kealy Heraldry