Monday, December 16, 2013

Crafting Storms


      Not that I am powering powerful have to craft up some amazing weather. Even though we've had
some wonderful snow to make it a very festive December. In Central Pennsylvania we got about a good 6 to 8 inches worth of the white stuff have enough to shovel. Heavy enough for me to only get a part of a days work in over the weekend. Was a little worried considering it was my on-call weekend the case I was going to have to run out to customers.  Luckily with all of everything else going on no calls really came in.  More snow is supposed to be coming in tonight. I know that it's going to be a real challenge to get all of my stops completed before the holidays. I do have a majority of my work to do this week, praying the weather holds.
In the meantime I have been crafting like a mad woman. At this point I am in the process of making a blackworked pouch with beading on it. It is in the same pattern as my black worked chatelaine from previous post. It is all drafted from the same piece of fabric with black embroidery, believe it or not was a short skirt. And unfortunately did not fit me so I found better uses for the fabric. I didn't find very many black embroidered type of cotton fabric,  it's was a great find.

     Besides making a pouch and working on the other blackwork
pieces to go with it. I have also been making stands for my linen ruff and cuffs. These are to help me better iron out my ruffs as well as for display purposes when I take them to competitions. What I did is I took wooden loops, there were letters from a craft store. Sewed a pouch of cotton fabric, inserted the wooden ring, and then stuff it with polyester batting. Proceeded to sew the back closed, glue them to the base piece of wood. And then glue that piece of wood onto the top of the wooden candlestick. I am going to paint the wood a beautiful gold color..

For more interest in not having a plain piece of white cotton fabric on top. I sewed the  heraldic patches on, from my peacocks as well as my heraldic shield to give it a unique look. Looking to see if there's some edging that I can do around the side with other needlework pieces. Though I have to be careful, because there's edges really are going to be used to help hold the ruffs to the stand. So more decision-making to be done though as you can see there has been some major progress

In my crafting moments, I been working on assembling the sleeves to my 16th-century embroidered
jacket. I have the sleeves pretty much completed this point and assembled with the guards on the top and a little bit of the shell beading.  I was planning on using some extra peach pink pearls with the gold spangles. I'm wondering whether not I want to make on the teal edges some very pretty snakes or salamanders out of these pink pearls to give it some extra interest I would only maybe put one or two. I don't plan on doing too much with the real edges. They already have coral stitching to keep them together and I do not want to hide all of that work.

I still have a lot of embroidering on the body of the particular piece. I've been working a lot of pattern
issues with this project. It's been a real challenge to make sure that everything is going to fit right and the gussets are going to lie flat and be the way that it was designed. So if all works out it's going to be one very stunning jacket. unfortunately my documentation on this is firm but I did not follow the period materials as much in making this. So I'm afraid that if I do put it in arts and sciences competition it is not going to score very well. Though I did learn a lot from making this particular project and that might be the only saving grace my documentation. To make more progress that I can post on this soon.

For now I got to get back to what I do best work, 

Maureen


.

Sunday, December 8, 2013

;-)Up to No Good ;-)

It's been a while, sorry to be away for so long. Life has been hectic and it's hard to keep up. Yesterday
participated  in the Kingdom of Aethelmearc: arts and sciences competition. I didn't win but I had a wonderful time, a great day of learning, and feedback for my work. Entered my embroidered Italian pocket, Elizabethan embroidered gloves, and my 16th-century marionette puppets. I had documentation for these, displayed my pearled partlet, but the documentation is still pending on this and my ruffs.  Below are listed a link to some pictures taken of me and my display, while I was at the championship. The teal and pink tudor gown really shows up very pretty and these pictures.

I also made a new chatelaine, one to match the blackwork pin cushion and measuring tape. I used the machine blackwork embroidered cotton fabric and attached it to my Tudor Rose cross stitched Sachet. Made a loop added Bee Pin for Elizabethan Costume Bees from Facebook.  I also covered the back to complete the look. So here is the resulting pictures of the completed work, stayed up late to complete this project.

Lady Mairin at Kingdom A&S Championship

Blackwork Chatelaine
I have been inspired to complete on my version of the Pilmoth Embroidered 16th Century Jacket. Have been working on adding cotton batting on the inside to give body to the jacket. I got pearls and glass beads to add the sparkle to the jacket.  I have some other decisions creatively for this project yet, but I have some good options.


I have the sleeves nearly done, lining the gussets, and work on peacocks on body panels. After all panels are embroidered, beaded, and lined then pieces are sewed together. It's going to take many weeks maybe months to get this project complete. The documentation is going to be non-existent since I did this opposite the norm of period embroidered jackets.Though it's going to be awesome to behold if I can get the vision in my head to be reality.

Work is going well, I am salary now. Interesting to see how this will work out for pay.  Still have to take state exam this month, hope to do well. Going to so more studying this week and stay up to date on my schedule. On the hubby front, Justin has a potential for a new job, hope it all works out. Things are looking up guess we will see how it goes.

Keeping Positive,

Maureen

Monday, November 4, 2013

Pocket Paradigm


Embroidered Appliqués
     Well I had a very productive weekend, despite being on call.  I have finished my pocket and I wanted to elaborate more on all of the work that I have done. It's time to get my work on the erect projects completed to be documented.

     I started with a linen base on my pocket which was made with a running stitch. The shape of a pocket traditionally is pear shaped. Mine is shield shaped, compared to the traditional. I wanted to go with something that had a longer top edge so I have an easier time putting a drawstring it though the top to be reinforced better. Though plans changed in the end on the strings. If I was sewing two corners, I wanted to really give it a little extra support in the pattern.
Linen base pocket

     I had made the original linen sometime ago and had not picked it up to do needlework, was going to make blackwork this originally. original in linen sometime ago. After having done some research even despite the pattern being a little bit different for my pocket. I will still wanted to use the linen that I already had. So I went to look and see if there was different types of materials I could use for the outside. And I found the documentation on Italian Soccici.

     Basically there wasn't any English version of these pockets until the 17th century. So the Italians were using a decorated pocket for ladieswear in the 16th century. I was basing my pocket on the extent example still exist, as well as a reference to a Italian fresco that shows a lady laundering items and has one of these pockets while she works.
Assembled Pocket with Embroidered Appliqués 

       After I studied the period examples, I looked at my stock of fabrics and chose the following materials; orange gold silk fabric and coral velvet fabric.  I had embroidery that I made on silk chiffon blend fabric and appliquéd it to the surface of my orange silk. Then I used the same unplied filament silk embroidery thread and made a border of floral accent in orange with a green herringbone stitch, where the velvet met the silk fabric. Then added pearls to the edges blending some into look like buds in the design.


The embroidery pattern is based from the painting of the Marchioness of Northampton; Helena Snakenborg circa 1569. This is the embroidery pattern that you see on her shirt in the painting, I enlarged it to look at the pattern. The  arrangement of the roses depicted is what I used as the basis of my embroidery pattern. It's an unplied filament silk embroidery on silk chiffon backing with fresh water pearl accents then appliquéd to the  pocket.
Added Appliqués and Pearls
       I had every intention of fingerloop braiding the tie strings and accents on this pocket. Unfortunately the unplied filament silk tangled as I was trying to create the fingerloop braiding. So I opted for a handmade version of some two colored twisted trim that you would generally use for edging and other purposes with garb making. I'm not exactly sure the time period in which this was created. I do know that you see similar treatments done for strings on 16th century purses and other accessories. In this case, this treatment worked really well with the silk and allowed it to slide past one another without tangling.
Completed Pocket

       What project would not be complete without pictures. I'm including that various
different photos  showing the progress that I had made despite working the weekend. Now to get the rest of it documented properly on paper  plus get the documentation done for the ruff and cuff suite as well as the gold work and pearled French Partlet.

Well that is it for now, I must get back to the mundane. I will be lining and adding the tie strings to my French partlet.

Until next time,

Mairin


Wednesday, October 30, 2013

Partlet a la Francais

Francois Clouet drawing 

       I had made this weekend on projects. I finally completed my French renaissance partlet. It has gold and silver cord trim, purchased at Pillaged Village. I hand embroidered some gold and silver work in a lozenge pattern with freshwater pearls at the intersections. It is based on portraits of nobles from the French court from 1520-1560 by the artist Clouet.

      I have yet to write up my documentation on this project and have yet to do the same on my ruffs. It's hard sitting with  hubby since time is limited in the evening to be together. I still have work on details of this project. It needs to be lined which I do still have some linen to line it with. And I also have to attach some ribbon to the corners in order to have ties. I also need to fine jeweled clasps like on the front of this example Clouet drawing above left.

French Partlet Back
Front French Partlet


On ward to pockets now. I have orange gold silk for the top face of the pocket and I have another fabric for the bottom, most likely be cold lozenge fabric which I'm going to use also as an accent fabric for these fancier pockets. I have silk thread to attach everything together and then the inside is lined with the linen. I was also thinking of using my coral colored velvet as another alternative to make a different style of the Italian  pockets.

Hope to post more progress on the pockets as soon as I can. Have so many ideas on design it's hard to narrow it down. This is why I am doing more than one based on portraiture from the period. That will be more explained when I finally write up the research. I need to get these projects done ASAP and sent to a friend. Let's hope when they are done that they get a warm reception.

Back to the Grindstone,

Maureen


Monday, October 21, 2013

Lucy Locket's Pocket

Puff of Ruff
       Trying to find time to make projects tasked to me at coronation, a challenge is always a healthy endeavor. Needing to show more variety in in my SCA projects, so trying to keep it Elizabethan practical so here it goes. The first of three projects to get some variety sparking. Making a set of embroidered pockets, an embroidered partlet, and a suite of ruffs. So when I get these done, will post pics as I am today.

Front and Back
Still working on 16th century references to embroidered pockets, not much success that is English pockets. Some continental versions that are made from fancy fabrics and couched embroidery. Which is on the trail! There are period examples of separate pockets but they are mainly Italian and some Spanish references. Turns out in Italian they are called a soccacia, who knew. There are English references in Queen Elizabeth's Wardrobe Unlocked to pockets she had made;. though they are period listings from her household and not much great detail is given other than fabric and color. No reference to decoration or use, which I am sure to an Elizabethan would be obvious. With the change vocabulary in our language its a bit murky. Some pockets referenced are matching fabrics from gowns also listed. Others are listings of many pockets made with no corresponding garment. My hypothesis is these separate pockets are made to go with many outfits separate of garments. I know from the foreign examples that the embroidery period extent pockets are a form of couching. Got to start from somewhere, so working on the historical origins of pockets to get a 16th century grasp.

This is the coif I want to embroider.
Found a nice pattern from an extant coif I want to emulate, it's really beautiful. I love the colors and pattern arranged on the coif. This one pictures to the left is in Patterns of Fashion 4. Its lovely!

Now to find time to make it;-) wish I could sew at work but between stops while driving is not advised. Plus my vehicle is a dirty utility work truck, would not want to put any light fabric in that vehicle. Let alone put any fabric at all in it for that matter.
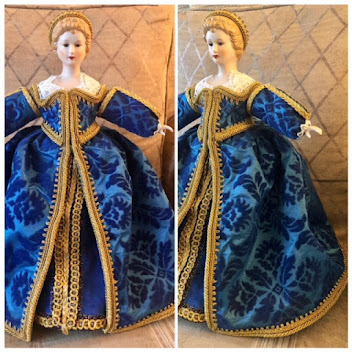
Regal Ruff Pose
Work has been busy as expected, though adjusting. Plus getting speedier at my tasks which is making things simpler to complete. Now that things are completed, I should have more time to make  projects.

On the ruff front, I got the suite complete except for the closure. So here are the pictures. This is not starched or ironed so please forgive the unorganized look of my sets. I wanted to get something to a patient audience, since its been a long time since I posted. 

Lozenge Pattern Inspiration
In the meantime, working on a French Partlet with gold and silver embroidery. Taking a drawing by the French court artist Clouet, and using the gold-worked partlet lozenge pattern base with some trim and pearls. So here is to patience since working with metallic threads tangle so badly. I will have to work it all in small sections of thread to save the bunching.thinking backstitch is what will make a smooth delicate line on the linen. 

Will post progress as I get along in the projects. Maybe sometime before I post again. So I wanted to thank everyone for the support of the blog over the past few years. My readership has grown more than I could expect for the narrow topics covered. Another milestone 200 posts in this journey of costuming discovery!

No pictures of me from Fall Coronation, that is what I get for being fashionably late ;-) Youth activities went well, spent time breaking up arguments mostly. Felt like Judge Mairin most of the day, lol. Near by game room was a happening place all ages could work together to learn the many games shared. It was a bit chaotic at time but for the most part everyone just needed some chaperoning to keep younger ones in check. I want to plan more things to do for next time. FFF will have more than just playtime, got some good ideas for that one.

  I was made a seamstress of the court with my limited help with making items for their Majesties. They are so generous, and it was totally unexpected. The items made worked out well and are still loved and used, that was my goal. I received a little scroll that is beautifully calligraphed, no illumination but its not needed. My teacher Duchess Ilish was made on as well, though she did far more work and labor. Made their Majesties Coronation garb, it took most of the night before the big day. A very talented and dedicated tailor, and Their Majesties look perfect!

Well that is about it for now,

Mairin


Sunday, September 22, 2013

Too Much of a Good Thing....

     Things have been crazy since, I took on my new job. No time to sew, no time with Justin, and little off to sleep and eat. Which is ok for now, overtime at a good rate is nothing to overlook. With Aethelmearc Coronation next weekend, I will have some pictures to post soon.

      Don't have much time to make anything lately, which has me in a creative craving lately. Though I am unclear on which project to finish or start next. I have a white and pink gown to make, an embroidered jacket to finish, make a proper gift for a close friend, and other pending projects.

Right now there is a lot of planning for the upcoming coronation. Looking at coloring on the morning, a crafts before and after Lunch then play till court. It's a nice schedule that is works well for most events. One thing I am certain, wearing my black silk and linen gown with ermine shoulder puffs. Will wear my whisk collar and I remade the net on the back of the hat. It's ornate beading and coloration accents the hat perfectly. It's time to finally show it off, want to look elegant and a bit understated to not outshine their majesties.

So far that is all that is going on now.

Maureen

Tuesday, August 27, 2013

Rapunzel, Rapunzel, Let Down your Long Hair...

To use up some fabric I had left over from my most recent projects, a gift from Lady Aibell Dimarta had me inspired. She found a lacy edged doll gown. Its looks like a Victorian nightgown, but also like Renaissance chemise ready to be matched with a a gown and something more grand. I did not know exactly how I was going to make the outfit. At the time had not clue about the accessories. Though I had lots of options to work with, which is always fun. Lets make something out of this baby doll clothing. At the time I was totally unsure of how the whole doll would look.

 So I knew of a blank muslin doll I could buy from one of my local craft stores that would really suit the bill. I am making a costumed doll and I am almost done, one problem she has no face. Until today that is, when I decided on brown eyes and larger features. I have a small section left of fabric that I am considering making fabric shoes to show as much fabric use as possible, its a only a 4 inch piece, so did really well with my goal of using the fabric.

She is going to be the princess Rapunzel from the fairy tales. I am thinking of having her be a reading doll prop for me. Thinking of story-time at SCA Coronation or for Rapunzel. I wasn't expecting the hair to turn out so nice, its artificial and from and existing pieces used for SCA events.. I got the hair pieces from Duchess Tessa, I liked it but thought it make a more striking appearance on my doll after I tried it on. Looked good but knew it would be very hard to not get unwanted attention at events well I do tend to make an entrance of sorts. 


Job update, I got my service vehicle on Friday after much rescheduling.  I am to work with a supervisor all this week and slowly incorporate skills and knowledge over the next 3 months. Pretty surprised at myself all the work I put in and did a hands on learning and fast paced. I pray to find something as nice of a  Slowly learning all the ins and out of my job, glad they try to be throughout and not to expect me to know it all in a week. Its sheer amazement still managed to sew something this week.

 Well back to it all,

Maureen

Goals & Improvements


Well I received my new corset in the mail.  Tried it on and fit perfectly, was unsure of the sizing by measurement would be right for me. Luckily my guess was correct. I took some more photos while wearing the corset to show how it looks under gowns as well as what it looks like with my other renaissance undergarments.

I want to thank my wonderful readers for all the page views. This blog has reached over 20,000 views this week, thank you! As a gift here are a selection of photos I took with the new under garments.

Humbled,

Mairin

Sunday, August 18, 2013

Compare Contrast


 Wanted to give a side by side comparison, I think that even with my few changes it turned out really nice and a good tribute to the outfit in the painting. I like making gowns from paintings but this was a real challenge finding a suitable fabric, which was a find when I found it locally. This dress is very comfortable and I like the colors even more now that I have worn it. When I get my new corset I know that the profile will work better even than seen here in the photos.

  Actually both gowns are very nice and turned out gorgeous. I also made a gown out of the cream with gold brocade fabric that was a gift from Duchess Ilish O'Donovan.  The hood, foresleeves and foreskirt being the same fabric, I used the gold lozenge fabric, which I bought for $1, to make a matching trim on the gown. Which the result turned out beautifully. I like these shades than than I thought I would. They work well with my hair and skintone. Guess when you know you know, trust in instinct.

 I finally posted a collection on the previous post of new gown photos, as featured in this post. Couldn't get my phone to take good pictures without the photos eating up all my memory on that device. So still tried and true old Sony digital camera came through. Will have to see what I can do about this, the camera will stop working eventually and I will have to find a reasonable replacement.

Anyway I hope to post more photos soon, will depend on my work schedule and free time. Need to get picture of the brocade rose accent gowns. Which one is leaf green with white trim and the other is gold with red trim.  I have hats for these too, they are more of a general Renaissance style gowns, than from a particular European country. Specifically, I will see if I can 'style' them with accessories to make them more versatile from wearing to wearing. For now got to get back to chores and laundry.

Always a Busy Bee,

Mairin

Teal Pink and White Gown Gallery


Replica 1560's Venetian Italian Fashion Doll

Replica 1560's Venetian Italian Fashion Doll

Replica 1560 French Fashion Doll

Replica 1560 French Fashion Doll

Tudor Q and A

What is a Tudorosity?

A mashed combination of the words Tudor and Curiosity to create the word Tudorosity. Tudorosities is the plural form and the deffinition is as follows.

Tudorosity- an desire to learn or know anything about the Tudor dynasty associated with years 1405 through 1603.

Most people ask my why I make the Tudor garb ?

I find the clothing of this era not only beautiful but also challenging to sew. There is much more care and purpose put into making garments and wearing garments in the Tudor Era. I love the look of Tudor so much I wanted to explore the way clothes were made back then and the subtle changes in fashion and styles of time.

How did you get started in this interesting hobby?

I started with art first, I love to draw, paint, and sculpt all the traditional fine arts. So being able to draw helps me visualize the looks I want to create in my garb. History has always been a huge interest of mine and I've had a knack for sewing since I was 7 years old. It all started with doll clothes and I learned cross stitch embroidery from my grandmother when I was little. I am self taught sewer, crochet, knitting, embroidery and tatting. My methods are learned from books mainly and there is still so much more to learn.

What is my favorite outfit and why?

It would be like picking a favorite out of one of my future children, its impossible. I love all my gown creations and really like the distinct differences in all the styles clothing I make for the Tudor Era.

Do you make the whole outfit including hat, shoes, and undergarments?

I do have a goal of making a complete Tudor from the skin out. As of right now I make 90% of my gowns and accessories. The shoes and stockings, are bought online and the petticoats are a close reproduction but not made by me. .

How long does it take to make a gown?

It all depends on the type of gown. The making relies on the time period and class of the design. Generally if I work on it 8 hours a day on a sewing machine it will take 3 days to get the basics and another 5 days to do finish hand-sewing details and beading. So a week to a week and a half if working on it steady for that amount of time. I work a full-time job so it does take longer than a week to complete. I put over 40-100 hours per outfit depending on its complexity, its like its own full time job of sorts.

Do you make renaissance clothing for sale or custom orders?

No, due to new employment and changes in my lifestyle. Unfortunately, I have no time to support sewing for others. Though I recommend sewing lessons for those adventurous few. There are many fine folks who make and sell historical clothing. I suggest guidance with sew from many fine historical enthusiastic costumers out on the internet.

How long have you been making these elaborate costumes?

I have been in the Society of Creative Anachronism coming up on my 18th year. Active since 2004 working at demonstrations and volunteering when I could between working and other life's distractions. I really concentrated on Tudor sewing in 2007 and worked with patterns to learn proper fabrics, techniques, fit, and silhouette. I really enjoy the eras transition from a medieval form fitting layered cotterdie to the boned Tudor kirtle and then to structured Elizabethan clothing.

Replica 1490 Milan Italian Fashion Doll

Replica 1490 Milan Italian Fashion Doll
Based on art by Giovanni Ambrogio

O’Kealy Heraldry

O’Kealy Heraldry