Showing posts with label crafts. Show all posts

Tuesday, June 10, 2014

So Many Pretties and So Little Time...

 
It is now that wonderful time of year again where I am deciding what I want to make next. I have a custom order pending, I'm waiting to hear some details. Custom orders are always a challenge and joy, I'm very excited to get started.
Included better photos of the embroidery box that I recently completed. The pictures before were a little dark. So cropped these and lightened them up so the detail is more distinct.

 I believe from what I can gather it's going to be in accessorizing late period gowns with a possible hat order depending on the customer. Which is always a good challenge to match up existing outfits to find proper accessories to give it that period finished look . So far my idea is to hand strand and knot a long freshwater pearl necklace on silk. I have some fantastic silk cord at home that will work great for this project. I also have some gold over silver ear wires that I will be able to use for dropped pearl earrings. I have to locate the proper size and weight freshwater pearl drops for the planned earrings. These two accessories are very commonly seen in anything from an Italian late period through some Spanish late period and English late period clothing. So these two items are very much something that you could transition through multiple gowns if need be. For the different time periods I play with within 100 year span I find it these transition pretty well from time period to time period.

I still have one late Italian gown that I want to make that is white silk with coral edging.  I have a  late Tudor in red velvet with brocade sleeves and inset skirt with foresleeves that are decorated. These two are gowns that I still have on my mind, that I want to make. Which I'm going to include the following pictures as inspiration from portraits. So these are pending projects but there's no deadline on when to get these gowns done. I have some red velvet but it is a  polyester nature. And it would behave for the well, it is the perfect shade to the red velvet in the portrait. Unfortunately it is not the content that I would be needing to make a arts and sciences based project. The other pieces I have for the foreskirt and the foresleeves is a similar pattern but not extact. But it would be a viable option to Pearl and finish them in a period method with lining them properly. I have some fantastic coral velvet that I would love to use for the coral and white and Italian gown. The portrait itself does look more like a silk fabric, in Italy silk was popular considering the climate. So I'm trying to find a viable trim that will simulate the white with pink embroidery we see on the gown. Trying to find a white silk that will suit the composition of the portrait. So I do want to hold off till I can find the right silk with undertones for this project. I do not normally make white gowns but this is one that I have admired for some time.

So on the garb plans for this year, projects waiting in the eaves.  I believe that these 2 gowns will occupy most of this year sewing time. Right now I am focusing on finishing my embroidered jacket.  I have decided to take out the coral wool stitched edging that I've been putting in for some months. Using matching teal thread in very fine small stitches around the teal trim. I am not able to take off the blue edging on outer edges of the jacket otherwise it will not fit properly. This occurred because of a improper patterning and sizing issue when I had created the project. Though at this point I know that when is complete it will look fantastic. I will be able to wear it over myself teal gown and it will match beautifully.  The silk downs that I bought off of eBay have proven their worth time time again. They are consistent with their fit in sizing, they work great as an under kirtle, since they're fully lined and boned, for Italian or English gowns.

Everything has a learning curve and I've learned very much of the past few months especially from a Ice Dragon on the areas I need to improve upon. So I'm trying to take this time to carefully choose the projects I want to do next. And see how close I can get to a proper historically accurate project. And I believe that working from portraits is really going to help me try to get that finished look. I do get quite a few compliments that I have stepped out from a portrait with my gown as is, but I want to make my silhouette more historical accurate and impactful if I can. 

Living the dream,

Mairin


Thursday, June 5, 2014

All work and no play...

It's been a hectic month, finally finished my work. I took on additional work to help with accounts needing serviced. Very successfully completed them before my deadline, which makes me happy. Turns out these locations I trained at over 9 months ago, so soon as I entered; recognized them immediately.  Finished them in time to make the trek home to meet up with hubby for us time, yay!

With my extra time was able to watch Maleficent in 3D with hubby yesterday. We had free tickets due to our loyalty club membership. It's not how I expected it to be but was interesting how the story danced in detail around the original animated feature from 1959.  I wish some of the story wasn't so rushed to workout the iconic scenes. Though overall I liked and the animation effects and such were dazzling. Out of the live action films so far I would say this is the best sticking to the original with a twist being from the villain point of view. It uses the first telling as a tale woven through time and the facts were lost in translation, which does happen in history. 

Since I had the rest of the weekend to myself despite being on call, I was able to finish up a small embroidery project that I had been working on for some time. This is the embroidery box that I created as inspired by the 17th-century embroidery caskets used to store embroidery items tools notions. Now this one is just a simple square box,  I was able to cover it over with Aida cloth and some of the edging is a strip of cross stitch fabric, the strip was decorated  for a bell pull.  I used it to go all the way around the edge of this particular box, as well as accent the top cover. I added some looped lace on the top cover for interest.I was able to also add one of my patches of my heraldic arms, there are two sequined peacocks with cockleshell's pearls and glass beads accenting flowers around the sides all done with silk. Most of this is a conglomeration of items that I already had in my embroidery stash of awesome. The peacocks I purchased specifically for this project and they would be considered tree ornaments in their original state.
Contemplating the next project. Though it's best for me to go back to the embroidered jacket to make actual progress on it. Came too far to turn back now, it will look great when done. I just wish it could embroider itself sometimes. Brings to mind my favorite scene in the 1959 movie Sleeping Beauty is, when the fairies are making the dress and it magically sews itself while waltzing in the air. I kind of wish there was that type of magic for creating my renaissance gowns as easily. The gown making scene by birds and mice in Cinderella was good too.
Wishing there were more hours in a day,

Mairin

Monday, December 16, 2013

Crafting Storms


      Not that I am powering powerful have to craft up some amazing weather. Even though we've had
some wonderful snow to make it a very festive December. In Central Pennsylvania we got about a good 6 to 8 inches worth of the white stuff have enough to shovel. Heavy enough for me to only get a part of a days work in over the weekend. Was a little worried considering it was my on-call weekend the case I was going to have to run out to customers.  Luckily with all of everything else going on no calls really came in.  More snow is supposed to be coming in tonight. I know that it's going to be a real challenge to get all of my stops completed before the holidays. I do have a majority of my work to do this week, praying the weather holds.
In the meantime I have been crafting like a mad woman. At this point I am in the process of making a blackworked pouch with beading on it. It is in the same pattern as my black worked chatelaine from previous post. It is all drafted from the same piece of fabric with black embroidery, believe it or not was a short skirt. And unfortunately did not fit me so I found better uses for the fabric. I didn't find very many black embroidered type of cotton fabric,  it's was a great find.

     Besides making a pouch and working on the other blackwork
pieces to go with it. I have also been making stands for my linen ruff and cuffs. These are to help me better iron out my ruffs as well as for display purposes when I take them to competitions. What I did is I took wooden loops, there were letters from a craft store. Sewed a pouch of cotton fabric, inserted the wooden ring, and then stuff it with polyester batting. Proceeded to sew the back closed, glue them to the base piece of wood. And then glue that piece of wood onto the top of the wooden candlestick. I am going to paint the wood a beautiful gold color..

For more interest in not having a plain piece of white cotton fabric on top. I sewed the  heraldic patches on, from my peacocks as well as my heraldic shield to give it a unique look. Looking to see if there's some edging that I can do around the side with other needlework pieces. Though I have to be careful, because there's edges really are going to be used to help hold the ruffs to the stand. So more decision-making to be done though as you can see there has been some major progress

In my crafting moments, I been working on assembling the sleeves to my 16th-century embroidered
jacket. I have the sleeves pretty much completed this point and assembled with the guards on the top and a little bit of the shell beading.  I was planning on using some extra peach pink pearls with the gold spangles. I'm wondering whether not I want to make on the teal edges some very pretty snakes or salamanders out of these pink pearls to give it some extra interest I would only maybe put one or two. I don't plan on doing too much with the real edges. They already have coral stitching to keep them together and I do not want to hide all of that work.

I still have a lot of embroidering on the body of the particular piece. I've been working a lot of pattern
issues with this project. It's been a real challenge to make sure that everything is going to fit right and the gussets are going to lie flat and be the way that it was designed. So if all works out it's going to be one very stunning jacket. unfortunately my documentation on this is firm but I did not follow the period materials as much in making this. So I'm afraid that if I do put it in arts and sciences competition it is not going to score very well. Though I did learn a lot from making this particular project and that might be the only saving grace my documentation. To make more progress that I can post on this soon.

For now I got to get back to what I do best work, 

Maureen


.

Sunday, December 8, 2013

;-)Up to No Good ;-)

It's been a while, sorry to be away for so long. Life has been hectic and it's hard to keep up. Yesterday
participated  in the Kingdom of Aethelmearc: arts and sciences competition. I didn't win but I had a wonderful time, a great day of learning, and feedback for my work. Entered my embroidered Italian pocket, Elizabethan embroidered gloves, and my 16th-century marionette puppets. I had documentation for these, displayed my pearled partlet, but the documentation is still pending on this and my ruffs.  Below are listed a link to some pictures taken of me and my display, while I was at the championship. The teal and pink tudor gown really shows up very pretty and these pictures.

I also made a new chatelaine, one to match the blackwork pin cushion and measuring tape. I used the machine blackwork embroidered cotton fabric and attached it to my Tudor Rose cross stitched Sachet. Made a loop added Bee Pin for Elizabethan Costume Bees from Facebook.  I also covered the back to complete the look. So here is the resulting pictures of the completed work, stayed up late to complete this project.

Lady Mairin at Kingdom A&S Championship

Blackwork Chatelaine
I have been inspired to complete on my version of the Pilmoth Embroidered 16th Century Jacket. Have been working on adding cotton batting on the inside to give body to the jacket. I got pearls and glass beads to add the sparkle to the jacket.  I have some other decisions creatively for this project yet, but I have some good options.


I have the sleeves nearly done, lining the gussets, and work on peacocks on body panels. After all panels are embroidered, beaded, and lined then pieces are sewed together. It's going to take many weeks maybe months to get this project complete. The documentation is going to be non-existent since I did this opposite the norm of period embroidered jackets.Though it's going to be awesome to behold if I can get the vision in my head to be reality.

Work is going well, I am salary now. Interesting to see how this will work out for pay.  Still have to take state exam this month, hope to do well. Going to so more studying this week and stay up to date on my schedule. On the hubby front, Justin has a potential for a new job, hope it all works out. Things are looking up guess we will see how it goes.

Keeping Positive,

Maureen

Monday, November 4, 2013

Pocket Paradigm


Embroidered Appliqués
     Well I had a very productive weekend, despite being on call.  I have finished my pocket and I wanted to elaborate more on all of the work that I have done. It's time to get my work on the erect projects completed to be documented.

     I started with a linen base on my pocket which was made with a running stitch. The shape of a pocket traditionally is pear shaped. Mine is shield shaped, compared to the traditional. I wanted to go with something that had a longer top edge so I have an easier time putting a drawstring it though the top to be reinforced better. Though plans changed in the end on the strings. If I was sewing two corners, I wanted to really give it a little extra support in the pattern.
Linen base pocket

     I had made the original linen sometime ago and had not picked it up to do needlework, was going to make blackwork this originally. original in linen sometime ago. After having done some research even despite the pattern being a little bit different for my pocket. I will still wanted to use the linen that I already had. So I went to look and see if there was different types of materials I could use for the outside. And I found the documentation on Italian Soccici.

     Basically there wasn't any English version of these pockets until the 17th century. So the Italians were using a decorated pocket for ladieswear in the 16th century. I was basing my pocket on the extent example still exist, as well as a reference to a Italian fresco that shows a lady laundering items and has one of these pockets while she works.
Assembled Pocket with Embroidered Appliqués 

       After I studied the period examples, I looked at my stock of fabrics and chose the following materials; orange gold silk fabric and coral velvet fabric.  I had embroidery that I made on silk chiffon blend fabric and appliquéd it to the surface of my orange silk. Then I used the same unplied filament silk embroidery thread and made a border of floral accent in orange with a green herringbone stitch, where the velvet met the silk fabric. Then added pearls to the edges blending some into look like buds in the design.


The embroidery pattern is based from the painting of the Marchioness of Northampton; Helena Snakenborg circa 1569. This is the embroidery pattern that you see on her shirt in the painting, I enlarged it to look at the pattern. The  arrangement of the roses depicted is what I used as the basis of my embroidery pattern. It's an unplied filament silk embroidery on silk chiffon backing with fresh water pearl accents then appliquéd to the  pocket.
Added Appliqués and Pearls
       I had every intention of fingerloop braiding the tie strings and accents on this pocket. Unfortunately the unplied filament silk tangled as I was trying to create the fingerloop braiding. So I opted for a handmade version of some two colored twisted trim that you would generally use for edging and other purposes with garb making. I'm not exactly sure the time period in which this was created. I do know that you see similar treatments done for strings on 16th century purses and other accessories. In this case, this treatment worked really well with the silk and allowed it to slide past one another without tangling.
Completed Pocket

       What project would not be complete without pictures. I'm including that various
different photos  showing the progress that I had made despite working the weekend. Now to get the rest of it documented properly on paper  plus get the documentation done for the ruff and cuff suite as well as the gold work and pearled French Partlet.

Well that is it for now, I must get back to the mundane. I will be lining and adding the tie strings to my French partlet.

Until next time,

Mairin


Tuesday, August 27, 2013

Rapunzel, Rapunzel, Let Down your Long Hair...

To use up some fabric I had left over from my most recent projects, a gift from Lady Aibell Dimarta had me inspired. She found a lacy edged doll gown. Its looks like a Victorian nightgown, but also like Renaissance chemise ready to be matched with a a gown and something more grand. I did not know exactly how I was going to make the outfit. At the time had not clue about the accessories. Though I had lots of options to work with, which is always fun. Lets make something out of this baby doll clothing. At the time I was totally unsure of how the whole doll would look.

 So I knew of a blank muslin doll I could buy from one of my local craft stores that would really suit the bill. I am making a costumed doll and I am almost done, one problem she has no face. Until today that is, when I decided on brown eyes and larger features. I have a small section left of fabric that I am considering making fabric shoes to show as much fabric use as possible, its a only a 4 inch piece, so did really well with my goal of using the fabric.

She is going to be the princess Rapunzel from the fairy tales. I am thinking of having her be a reading doll prop for me. Thinking of story-time at SCA Coronation or for Rapunzel. I wasn't expecting the hair to turn out so nice, its artificial and from and existing pieces used for SCA events.. I got the hair pieces from Duchess Tessa, I liked it but thought it make a more striking appearance on my doll after I tried it on. Looked good but knew it would be very hard to not get unwanted attention at events well I do tend to make an entrance of sorts. 


Job update, I got my service vehicle on Friday after much rescheduling.  I am to work with a supervisor all this week and slowly incorporate skills and knowledge over the next 3 months. Pretty surprised at myself all the work I put in and did a hands on learning and fast paced. I pray to find something as nice of a  Slowly learning all the ins and out of my job, glad they try to be throughout and not to expect me to know it all in a week. Its sheer amazement still managed to sew something this week.

 Well back to it all,

Maureen

Tuesday, May 21, 2013

Medallion Medley

Well here is a story for you:

 I had showed my Order of the Sycamore medallion to my shiremates at War Practice. All of us agreed, that I should give it more pizzaz to go with my late period gowns and accessories. I had worked out a design on the way home in my mind. I wrapped the copper loop in white ribbon and sewed flat gold beads around the outside to give shine and texture. I then used UV protected nail polish and built up layers of clear polish on the center brass leaves design, added black lines with ball point pen, and layered more clear polish over top to secure the ink. Then colored red side of the medallion, and redrew some lines that were faded with the additional color. I added one last layer of clear all over the leaves. Its not the most period method but I didn't want to changed much from the orginal given.

The necklace is one I have had made from beads given as Arts and Sciences favors when I started in the SCA, Oh some 8 years back, I keep all tokens just in case. I also made a neat pair of earrings from two matching tokens. On this projects I added the bread caps and filligree for that fancier late period touch.

I hope to get my Sycamore scroll at my next Aethelmearc Kingdom event, which will be AE Academy at the end of June. I am excited, been wondering how it will look and what the exact wording would be and who was the person that has made it. In the mean time, I will work with others in the scribal community to check if it will make it to me. I believe it is a finished project, since Their Majesties mentioned it was no able to make it to War Practice and not a work progress and such.

So after working on the medallion for two days, I wanted to show my results. With the layers of polish and pen, I added the heraldic colors of the Order of the Sycamore on the medallion itself. I found out most folks use a polymer enamel modernly that is easier to work with compared to the traditional glass methods. Nail polish is not that far off from what they use commerically, in period they would use glass powder, a hot kiln and many hours of work on metal in many shaped pieces to adhere the enamel to and make links to make chains in various lengths. I hope to use my medallion as a way in my Jewelry class to show how one can take something simple and make a late period piece come out of simple materials found at home.

Well back to more mundane activites,

Lady Mairin

Monday, January 14, 2013

Hatamania Revisited

Well as well as working on wonderful lace projects lately, I have been revisiting one of my old projects, French Attifet style hats. Though I have heard a more appropriate description is heart-shaped coif. Which I like this better for discussing this wonderful style of hat for late period gowns.

 I have made some bun covers to go with hats for later period gowns. Though these are more like an heart shaped french Juliet cap with hair net attached.These really have alot of lace detailed features that I have been enjoying.  So far I have one that is made from floral embroidered fabric have to trim it yet, one in blue with french lace covering, one in green with battenburg lace covering, one made entirely from battenburg lace.

 I want to make on in peach with the same lace covering as the blue and one that is a floral brocade. Very excited to see how they wear with the gowns.For now here are pictures of the three I completed so far.

Focused,

Maureen

Monday, December 3, 2012

Productive Weekend Crafting

Well been busy with things I want to get done for a change. Besides getting the required chores done that need to be completed by weeks end, I was able to get some crafting completed too. I have had a collection of feathers meant for Elizabethan fans for sometime. I decided to finally make the hat pins and fans I was wanting, though not without complications. I had bought a finial to make a handle for one of the fans, thought to my misfortune  I cannot find it anywhere in my craft room. Necessity is indeed the mother of invention, so I modified some broken wooden handles from some household tools. Though I will buy some decoration for either side of the handle to give aesthetic appeal and cover my glue joint to the handle.

Also on the Tablet Weaving front, I have made some garters in a coral wool yarn. Wasn't sure how the much thicker yarn was going to hold up but it did well. I am now working with another yarn in lavender and using a metallic weft thread, sparkles on the ends of the weave. Looking really cool, hoping the rest of the weave turns out pretty. I am thinking of using my single ply wool on this and seeing how it all turns out. Hmm should be interesting. Thought I would share my progress so far with a few pictures...

Below is an Elizabethan Feather Fan
 Below is a Feathered Hat Pin
 Below is another Elizabethan Feather Fan
 This is the second Feathered Hat Pin 
 Last but not least Tablet Woven Coral Wool Garters

... well that is what I have been up to this weekend. I hope to get pics of the lavender tablet weaving and such when its done. I also started small leaves on the back panel of the Elizabethan Jacket, baby steps I suppose. The jacket is one long and daunting feat, though it will pay off in the end. Well back to the workweek and hoping for some evening time to work and finish the weaving and embroidery.

Crafty Thoughts,

Maureen 

Tuesday, November 27, 2012

Elizabethan Jacket- Panel 4 Completed


Well just finished Panel 4, all the sleeves are now done! Super excited and happy with the progress so far. Am using more filling stitches and less other decorative stitches to make more progress faster, though I look to add more detail when I assemble with some herringbone stitches, some more finishing stitches and such. So more things to come.

So total for this project I have all the collar, sleeve tabs, gussets, and sleeves all embroidered. Now on to the body panels. Right now I decided to work on the back and see how it all turns out. I still have assembling and lining the whole outfit yet to do, that will be a feat all in itself. So a few down and lots more to go! Though I am happy with now fast and unique each panel is and now awesome I know they will look when put together as all one unit.

I am thinking some of the cohesive colors and panel assemblage will make this very challenging and unique project, beyond me putting my own personal spin on the flowers, edged pattern pieces, color choice, and design decisions for individual pattern panels with nothing repeating from panel to panel expect trailing vines. Yeah its based on an Elizabethan Embroidered Jacket, though its taken on a life all its own in the embroidery process.  

Well time to get to bed for another exciting day of work, its been a busy night. Hope to make more progress tomorrow. Beginning to see the light at the end of a very long tunnel.

Dreaming of stitches,

Maureen

Sunday, November 25, 2012

Elizabethan Jacket- Panel 3 Finished


Well I have the major parts on this embroidery laid on this sleeve. Now on to the next one! This one I was able to leave some more space but and planning on filling some areas with leaves and more detail. Though I think it is turning out really nice so far. The next one is more cramped with spacing due to the gold work, so I will have to get creative on some of the size and copy some flowers on this one to the next sleeve. Though I am very interested in seeing how this all goes, will have to roll with it.

Thought you would be glad to see I didn't forget with all the happenings and holiday, about this project. Well back to getting the next sleeve done.

Embroidering some more,

Mairin

Tuesday, November 20, 2012

Bonnet Bonanza

Well I decided I wanted some Elizabethan Style bonnets also called a snood, and cauls. Since I have the gowns to wear, its time to have proper headgear. So I am making a few heart shaped style hats, and will see about some coifs too. Here is what I have done so far. I also bought some rat like hair accessories, to get the smooth Elizabethan hairstyle. Though I am not sure if I like them as much as teasing up my curls and spraying them to shape. Guess we will see, both methods are perfectly acceptable means to the look.

Thanks,

Mairin

P.S. This is my 150th post! Thank you all for reading the ravings of a woman mad about Elizabethan and Tudor Historical Costume.  Your insights make this blog so much more enriched.

Tuesday, November 13, 2012

Learning Something New, Lessons Anyone?!?

To further more elgant persuits, I am learning some new crafts. One is learning to play the lute, though I have the grand instrument, I need to find time and get the lessons from local friend. Though my theory is its like a guitar but different. Which I already play guitar, so this should be challenging. Mine came in this nice hardcase to protect it and store while not in use.
Second is learning to tablet/card weave, always wanted to learn to do this to make trim, garters, and belts. Guess we will see how it all goes, here is my progress so far. This loom I made last week with the help of my good friend, Lady Aibell. She has been doing tablet weaving for sometime, we wanted to make a simple learner rig for people to get a grasp with, been lots of fun to work with.
I also wanted to let folks know that I am available to give sewing lessons to the public. We can start with an small easy project and work to make challenging crafts. Contact me if interested, we can discuss ideas and cost:  faerydustcollector@gmail.com

Monday, August 27, 2012

Sharing Progress with Embroidery

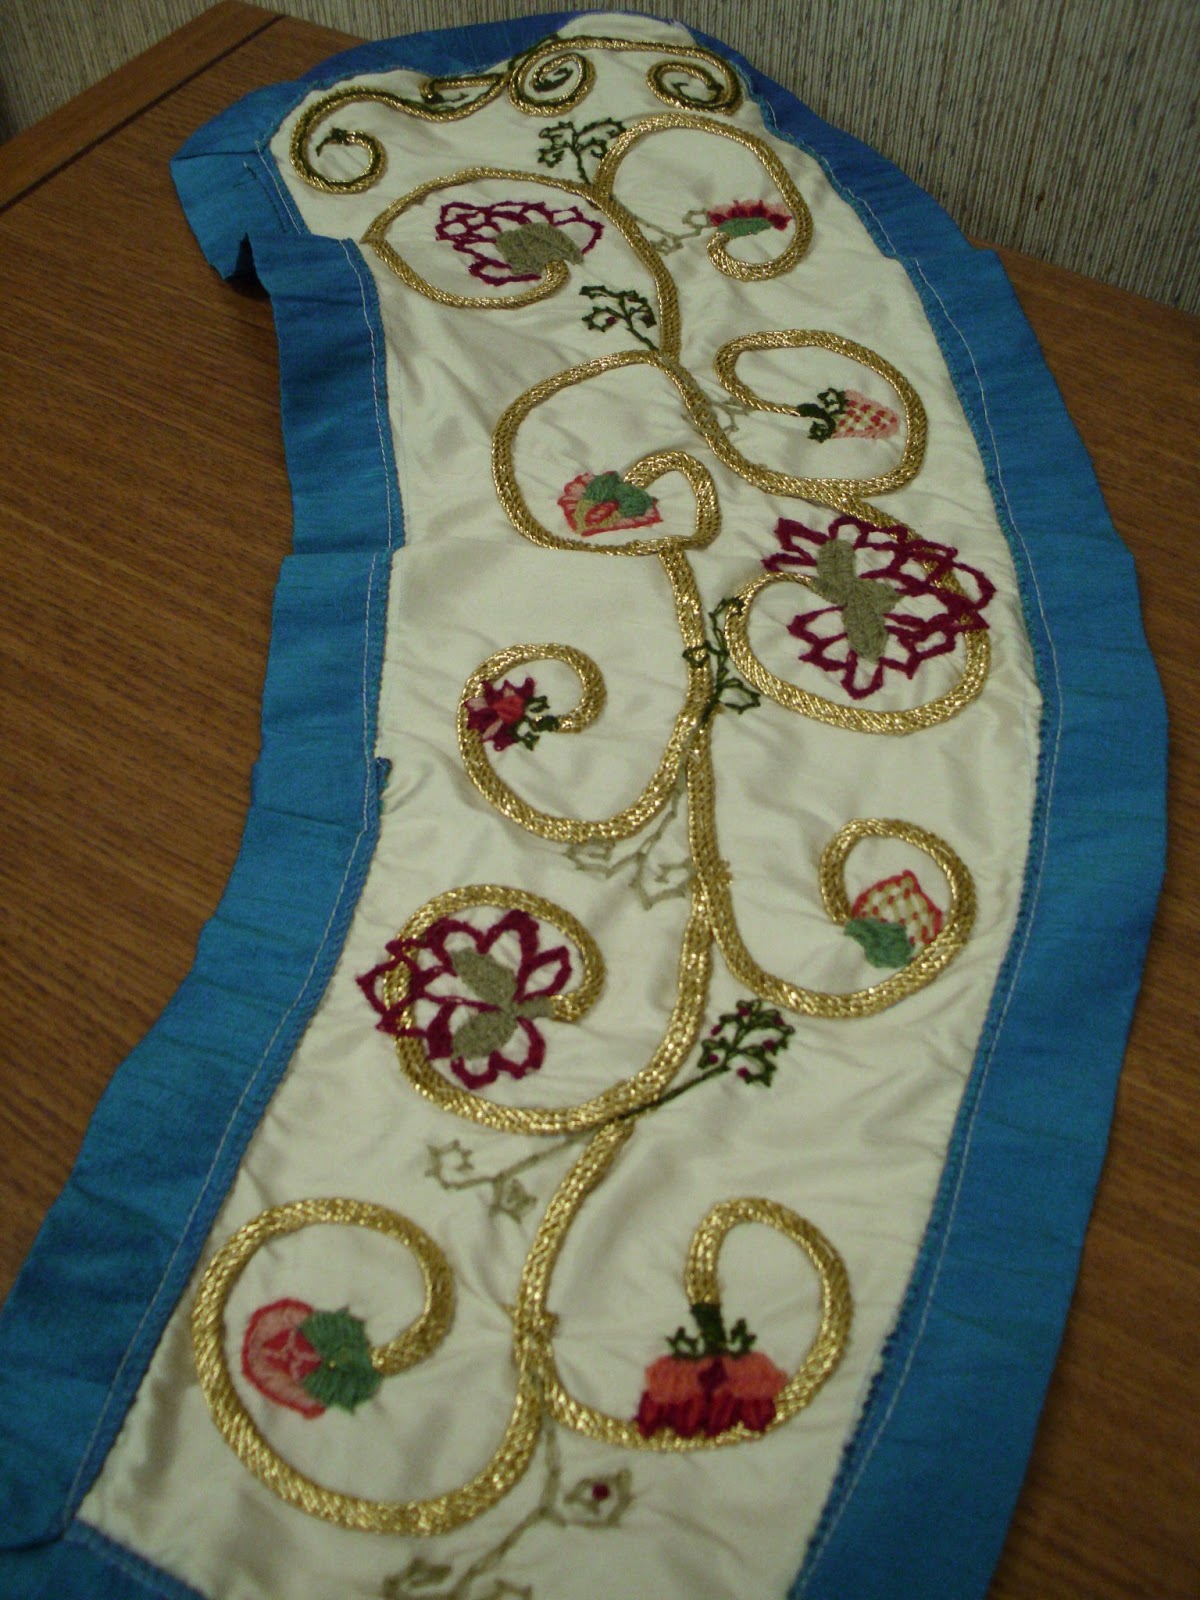
Well I finally stared working up the embroidery. I decided not to make a repeating pattern of florals on this Elizabethan Embroidered jacket. I want to really have fun and keep it random with as many flowers, berries, nuts, and insects as I can concoct. Considering putting a praying mantis at the top of this as well as caterpillars and butterflies all over. I do have peacocks on the bottom but not sure if I want to add any other birds to this garden. We will see how it all goes, want it to be very original and garden-like.

Since i took this photo the empty spot at the middle bottom is transforming into a pomegranate, a strawberry leaf near the strawberry blossom, small oak leaf near the acorn, and berries near the holly leaf. I am going to make sure my shapes are going to fit in the space, though its going to be a challenge. Though I am up for that anytime.

Well back to it,

Maureen

Tuesday, July 19, 2011

A Fresh Start... A Sewing Box


Forgot to post this yesterday but epiphanies come after writing of course. I had a few months of debating on a small accessories box that came with two hat boxes. Black and gold chenille brocade with gold trim and tassel for accent, its really cute. As small and adorable as this box is, I didn't want another jewelry box. So it sat empty most of the summer, after my wicker basket gave me splinters and tumbles open on the floor, so I had it and knew it was time to find something better . I looked around and heaven opened my eyes to the small perfection in front of me. I immediately set to work carefully placing pins on the inside into the thick cardboard walls to hold scissors, thimbles, pin holders and the lot. Its my fashionable travel sewing box and I have some pictures for your amusement. Inspired to make fabric pockets for my larger sewing box that stays at home though I have to plan that out more carefully. Besides as of right now other projects take priority. Did make really nice progress on the Custom Gown, now to make the hat ;-)

Sew Amusing,

Maureen

Monday, June 14, 2010

So Many Projects So Little Time

I have had so much on my mind as far as new things to do it has been dizzying. Unfortunatley no time or the lack of materials to do them. So sitting and spinning and getting no where has been a constant lately. The list of to do things are as follows:

Work on rolled edging for silk veils and pearl edges, blackwork embroider my ladies pockets, finish all the embroidery for O'Cadhla castle's interior furnishings. Finish and stain all the interior furnishings and get all the windows and interior walls drawn on the plywood and sent to get cut. Put together the caslte and texurize the walls for the stucco look inside and brick look outside. Work in Embroidered bookmarks for largesse. Make a crewel work Elizabethan Ladies Jacket, Coif and Kirtle. Knitt socks from spun wool, dye and ply wool for crewel embroidering.

That is all I can think of off the top of my head for now but I know the list can be more than a mile long. Now that my work schedule has changed and there is less time to work on SCAdian things I am feeling a bit of a pinch. Though I just need to strictly dedicate some time to getting some things done and I won't feel the pressure as bad. There really isn't any time limit for most of those projects, I just want to get them done and enjoy them sooner rather than later. Guess I have no choice but to be patient.

Patience is a virtue,

Maureen

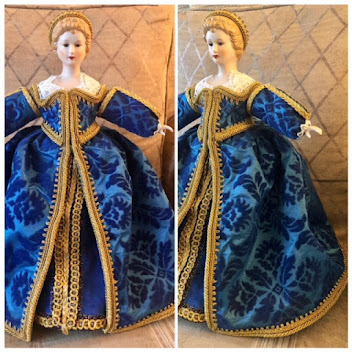
Replica 1560's Venetian Italian Fashion Doll

Replica 1560's Venetian Italian Fashion Doll

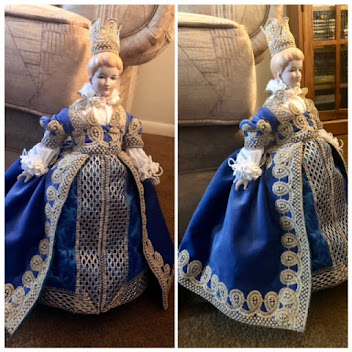
Replica 1560 French Fashion Doll

Replica 1560 French Fashion Doll

Tudor Q and A

What is a Tudorosity?

A mashed combination of the words Tudor and Curiosity to create the word Tudorosity. Tudorosities is the plural form and the deffinition is as follows.

Tudorosity- an desire to learn or know anything about the Tudor dynasty associated with years 1405 through 1603.

Most people ask my why I make the Tudor garb ?

I find the clothing of this era not only beautiful but also challenging to sew. There is much more care and purpose put into making garments and wearing garments in the Tudor Era. I love the look of Tudor so much I wanted to explore the way clothes were made back then and the subtle changes in fashion and styles of time.

How did you get started in this interesting hobby?

I started with art first, I love to draw, paint, and sculpt all the traditional fine arts. So being able to draw helps me visualize the looks I want to create in my garb. History has always been a huge interest of mine and I've had a knack for sewing since I was 7 years old. It all started with doll clothes and I learned cross stitch embroidery from my grandmother when I was little. I am self taught sewer, crochet, knitting, embroidery and tatting. My methods are learned from books mainly and there is still so much more to learn.

What is my favorite outfit and why?

It would be like picking a favorite out of one of my future children, its impossible. I love all my gown creations and really like the distinct differences in all the styles clothing I make for the Tudor Era.

Do you make the whole outfit including hat, shoes, and undergarments?

I do have a goal of making a complete Tudor from the skin out. As of right now I make 90% of my gowns and accessories. The shoes and stockings, are bought online and the petticoats are a close reproduction but not made by me. .

How long does it take to make a gown?

It all depends on the type of gown. The making relies on the time period and class of the design. Generally if I work on it 8 hours a day on a sewing machine it will take 3 days to get the basics and another 5 days to do finish hand-sewing details and beading. So a week to a week and a half if working on it steady for that amount of time. I work a full-time job so it does take longer than a week to complete. I put over 40-100 hours per outfit depending on its complexity, its like its own full time job of sorts.

Do you make renaissance clothing for sale or custom orders?

No, due to new employment and changes in my lifestyle. Unfortunately, I have no time to support sewing for others. Though I recommend sewing lessons for those adventurous few. There are many fine folks who make and sell historical clothing. I suggest guidance with sew from many fine historical enthusiastic costumers out on the internet.

How long have you been making these elaborate costumes?

I have been in the Society of Creative Anachronism coming up on my 18th year. Active since 2004 working at demonstrations and volunteering when I could between working and other life's distractions. I really concentrated on Tudor sewing in 2007 and worked with patterns to learn proper fabrics, techniques, fit, and silhouette. I really enjoy the eras transition from a medieval form fitting layered cotterdie to the boned Tudor kirtle and then to structured Elizabethan clothing.

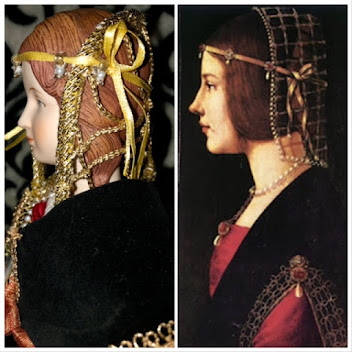
Replica 1490 Milan Italian Fashion Doll

Replica 1490 Milan Italian Fashion Doll
Based on art by Giovanni Ambrogio

O’Kealy Heraldry

O’Kealy Heraldry